

On this page
Top picks at a glance
As an Amazon Associate I earn from qualifying purchases.
- 1
 EVIORTER Solar Electric Fence Charger9.4/10View on Amazon
- 2
 EVIORTER 0.11J Solar Fence Charger9.4/10View on Amazon
- 3
 10 Mile Solar Electric Fence ChargerView on Amazon
- 4
 Solar Fence ChargerView on Amazon
- 5
 Parmak SE5 504564 Super Energizer 5 Low ImpedanceView on Amazon
- 6
 Zareba ESP2M-Z Solar Powered Low Impedance Electric FenceView on Amazon
- 7
 24-Hour Solar Electric Fence ChargerView on Amazon
- 8
 Gallagher S12 0.12J Electric Fence Charger with 328ft Roll ofView on Amazon
To install an electric fence charger, mount the unit in a sheltered spot near its power source, drive the ground rod deep into moist soil, connect the ground terminal to the rod and the fence terminal to the fence wire, then power it up and check the indicator. That is the whole job in one sentence; the sections below walk through each step with concrete figures taken from charger listings.
Also worth comparing
 10 Mile Solar Electric Fence ChargerCheck price on Amazon
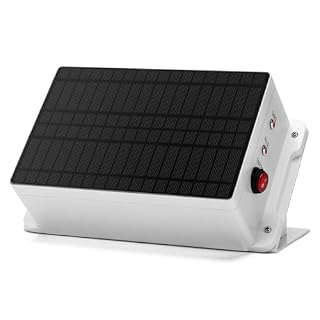 Solar Fence ChargerCheck price on Amazon
 Parmak SE5 504564 Super Energizer 5 Low ImpedanceCheck price on Amazon
 Zareba ESP2M-Z Solar Powered Low Impedance Electric FenceCheck price on Amazon
 24-Hour Solar Electric Fence ChargerCheck price on Amazon
 Gallagher S12 0.12J Electric Fence Charger with 328ft Roll ofCheck price on Amazon
GoatGearLab earns a commission when you buy through links on this page, at no extra cost to you. As an Amazon Associate I earn from qualifying purchases. Affiliate disclosure.
How to install electric fence charger: the short answer
Pick a charger that matches the fence: plug-in AC models suit fences near an outlet, while 12-volt battery and solar models suit remote paddocks. Mount the charger under cover, drive the ground rod to the depth the listing states, wire the two labeled terminals, fit warning signs where people can reach the fence, and confirm the pulse on the indicator before walking away. One listing notes the whole hookup takes just over 10 minutes with its labeled terminals and included manual.
Pick the charger and the power source
Start with power, because it decides where the charger can live. Plug-in models run on mains: one listing describes a 110-volt AC plug-in design, another accepts 110 to 240 volts, and both suit fences within cord reach of an outlet. For remote fences, several listings support 12-volt battery input, and solar models carry their own panel and lithium battery; one solar listing states up to 3 weeks of operation without sunlight, which covers long cloudy stretches. A low 2-watt draw on one dual-power model shows how little energy these units sip. If you are still deciding between power types, our solar vs battery fence energizer guide compares them.
Mount the charger out of the weather
Chargers last longer under cover. One listing recommends adding a waterproof cover for outdoor use, while others carry an IP65 water and dust rating with operating ranges down to minus 40 degrees Fahrenheit or minus 20 Celsius. Mounting hardware varies: one unit has rear mounting holes, another ships a mounting hook for wall or post mounting. Pick a spot close to both the outlet or battery and the fence line, so the leads stay short and out of the way.
Drive the ground rod
Grounding is the step that makes or breaks the fence. One listing recommends 31.5 to 39.37 inches (80 to 100 cm) of copper or iron stake in moist ground, and another specifies burying the earth rod to 1.5 m (59 in). Moist soil conducts better, so choose a damp spot rather than high dry ground. The charger connects to its own separate ground system through the ground terminal; keep the rod and its lead away from other buried metal, and avoid mixing different metals in the fence system to prevent electrolysis issues.
Wire the two terminals
Chargers in these listings use two clearly labeled terminals: a ground terminal for the independent grounding system and a fence output terminal for the fence connection. Run the ground lead from the ground terminal to the ground rod, and the fence lead from the output terminal to the fence wire, using the screw-on terminal knobs or alligator clips the kit includes. Keep the fence wire 6 cm (2.3 in) from wooden posts and 10 cm (3.9 in) from surrounding wire mesh, per one listing, and keep wire joints above soil level, sealed with thick paint, epoxy or tar against moisture.
Power up and check the pulse
With wiring done, power the unit and watch the indicator. Listings describe a lit indicator light with an audible current sound, flashing work lights that pulse with the fence, and real-time voltage displays; one model pulses once per second and another on a 1.2-second interval. A steady flash means the charger is pulsing normally. If the light stays dark, recheck the power source and both terminal connections before assuming the unit is at fault. Keep hands off the live wire; the indicators exist so you never need to touch the fence to know it is working.
Fit warning signs
Fit a warning sign at every point where persons may gain ready access to the conductors, as one listing instructs. Some kits include the signs; one ships two warning signs with alligator-clip leads in the box. Place them on the fence line at gates, paths and anywhere the public passes close, before the fence goes live.
What this guide does not cover
This guide covers installation hardware only: mounting, grounding, wiring, signs and the first power-up check. It does not cover charger sizing in joules or miles of fence, which belongs to the buying guides, nor animal behavior or veterinary questions. For sizing help see our best electric fence charger for goats picks.
FAQs from goat keepers
How deep should the ground rod go?
Follow the listing: one recommends 31.5 to 39.37 inches (80 to 100 cm) for copper or iron stakes in moist ground, and another specifies 1.5 m (59 in) for the earth rod. Deeper and damper is better for conductivity.
Can I install a charger with no outlet nearby?
Yes. Several listings support 12-volt battery input for off-grid use, and solar models run continuously from their panel and battery; one solar listing states up to 3 weeks of operation without sunlight.
How long does installation take?
One listing states just over 10 minutes with clearly labeled terminals and the included manual, with no professional experience needed. Grounding takes the longest, so have the rod and a driver ready.
Does the charger need a waterproof cover?
It depends on the unit. One listing recommends adding a waterproof cover for outdoor use, while others list IP65 water and dust resistance. When in doubt, mount under cover.
Which wire goes on which terminal?
The ground terminal connects to the separate ground system at the ground rod, and the fence output terminal connects to the fence wire. The terminals are labeled on the units in these listings.
More from the barn
See every electric fence charger guide and all goat fencing guides.
More picks: best electric fence charger for goats, electric fence charger vs energizer and solar vs battery fence energizer.